If you're looking to make your naturally dyed Easter eggs a bit fancier, this video has some awesome tips for making sparkly eggs, decoupaged eggs, and more - all using natural or recycled ingredients. If your kids are a little older, they'll love these fun advanced Easter egg decorating tips. Check out these fun and easy suggestions, and make your Easter eggs extra special this year!
Decorate Eco Easter Eggs {kids + eco friendly craft}
This easter, be kind to the earth by embellishing eggs and easter baskets the natural way using environmentally friendly items.
An informational blog offering helpful ways to reduce your toxic load and live greener, as part of our new holistic living blog network.
Showing posts with label Easter craft idea. Show all posts
Friday, March 29, 2013
Wednesday, March 27, 2013
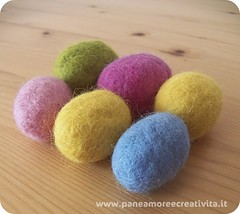
Eco-Friendly Craft: How to Make Felted Easter Eggs
What’s better than a brightly colored Easter Egg? Why a soft and fuzzy one of course! Felted Easter eggs are fun and easy to make. And you don’t have to worry about a felted egg rotting or going to waste. They’re bright, beautiful and easy to make. Here’s how:
Materials Needed:
Step One: Wrap a piece of felting around a foam egg. Gently hold the egg in one hand while you poke the felting with your needle. The goal is to get the felting to adhere to the foam egg. Gently poke the felting all around the egg. There is a small learning curve here. You’ll eventually learn how much pressure is required to adhere the wool to the egg. Once the piece of wool is attached move on and add another piece of felt. You can switch colors or color your entire egg the same and add other colors on top.
Step Two: Using a fine point marker, draw a design on your egg. You might want to plan it out on paper first. For example, you might decide to create a circle of smaller triangles around the middle of your egg. Draw those on so you place your felt pieces on your egg accordingly.
Step Three: Cut the wool pieces out of your roving. For example, if you’re adding triangles to your egg you’d cut out the triangles from a new piece of roving. Using your felting needle poke the new pieces of wool into the egg until they’re attached. Once you’re happy with your design you can start a new egg.
Displaying Your Felted Eggs
You have several options to display your felted eggs. You might choose to display them in a glass bowl or basket. You might attach an eye-screw to the top of the egg and hang them. You can add ribbons to the top too.
Making felted eggs is easy. It’s even a craft you can do with your children. Make sure to show them how to attach the wool to the foam egg carefully. You don’t want them to jab the needle through the foam. Consider making felted eggs a part of your Easter tradition. Each year you and your family can add a few eggs to your collection. You might also give them away as gifts, and they make a fun party favor.
Materials Needed:
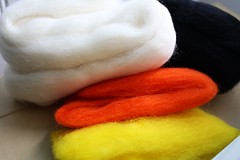
| Different colored roving (Photo credit: Rakka) |
- Styrofoam eggs – you can find these at your local craft store.
- Wool roving – you can make your own wool roving or you can purchase prepared wool at your local fabric store. Choose the colors you desire for your eggs. Pastels are nice.
- Fine point marker for drawing your design
- Felting needles – can be found at your local craft store.
Step One: Wrap a piece of felting around a foam egg. Gently hold the egg in one hand while you poke the felting with your needle. The goal is to get the felting to adhere to the foam egg. Gently poke the felting all around the egg. There is a small learning curve here. You’ll eventually learn how much pressure is required to adhere the wool to the egg. Once the piece of wool is attached move on and add another piece of felt. You can switch colors or color your entire egg the same and add other colors on top.
| Felting eggs (Photo credit: Linda (Pane, amore e creatività )) |
Step Three: Cut the wool pieces out of your roving. For example, if you’re adding triangles to your egg you’d cut out the triangles from a new piece of roving. Using your felting needle poke the new pieces of wool into the egg until they’re attached. Once you’re happy with your design you can start a new egg.
Displaying Your Felted Eggs
You have several options to display your felted eggs. You might choose to display them in a glass bowl or basket. You might attach an eye-screw to the top of the egg and hang them. You can add ribbons to the top too.
Making felted eggs is easy. It’s even a craft you can do with your children. Make sure to show them how to attach the wool to the foam egg carefully. You don’t want them to jab the needle through the foam. Consider making felted eggs a part of your Easter tradition. Each year you and your family can add a few eggs to your collection. You might also give them away as gifts, and they make a fun party favor.
Labels:
Color,
Easter,
Easter craft idea,
Easter egg,
Eggs,
Felt,
felted eggs,
holiday crafts,
making felted Easter eggs,
Styrofoam,
Wool
Subscribe to:
Posts (Atom)